
Moto Tech Talk: Rewiring Your Vintage Motorcycle
The inaugural Moto Tech Talk, our soon-to-be monthly column on all things with a motorized two-wheeled bent, features A & J Cycles' Brian Ballard tackling the lost art of rewiring your vintage motorcycle. Each month a new guest writer will contribute their advice, thoughts and opinions on issues all riders face while maintaining, upgrading or restoring their bikes. If you have a column in you, a gift for writing and unbridled enthusisasm for motorcycles, contact us at: rahoul@nycmotorcyclist.com.
DISCLAIMER: The methods in this article are guidelines, provided and performed by a trained mechanic. If you are not comfortable performing routine maintenance on your bike, it is recommended you get a trained mechanic to complete these and more difficult tasks on your bike.
So you just scored a killer deal on a 1975 Honda CB750.
As with every other vintage bike for sale on craigslist it ran when parked a few years ago. You bring it home, put some fresh gas and a new battery in it and it starts right up. You take it out for your first ride and 20 minutes into the trip, the bike cuts out. You are forced to push it to the side of the road and have a friend come pick you up. Now comes the fun part … where to start.
You pull off your seat and side covers, and this is what you are left staring at:

— Brian Ballard
You bring it home, put some fresh gas and a new battery in it and it starts right up. You take it out for your first ride and 20 minutes into the trip, the bike cuts out. You are forced to push it to the side of the road and have a friend come pick you up. Now comes the fun part … where to start.
There's a lot of crusty connectors, wiring and old technologies, more than likely repaired numerous times over the years. To begin, you download a wiring diagram to make some sense of what you've inherited.
We have taken a few different approaches: testing, isolating issues on the stock harness, upgrading select components, installing a new aftermarket harness (SparckMoto, etc), or going to the extreme – starting over and rewiring the bike from scratch with the Motogadget M-Unit. While aftermarket harnesses are a nice option, the quality varies greatly amongst the different products currently on offer. Our personal recommendation is rewiring with the Motogadget M-Unit. The finished product will be a journey that will reward you with reliability and advanced features that are not available with the factory setup.
The latest solutions from Motogadget include the M-Unit Basic and M-Unit Blue. Both offer the same ease of install and simplicity, while the M-Unit Blue adds bluetooth functionality to program, test and also use as your key along with the M-Ride app from Motogadget.
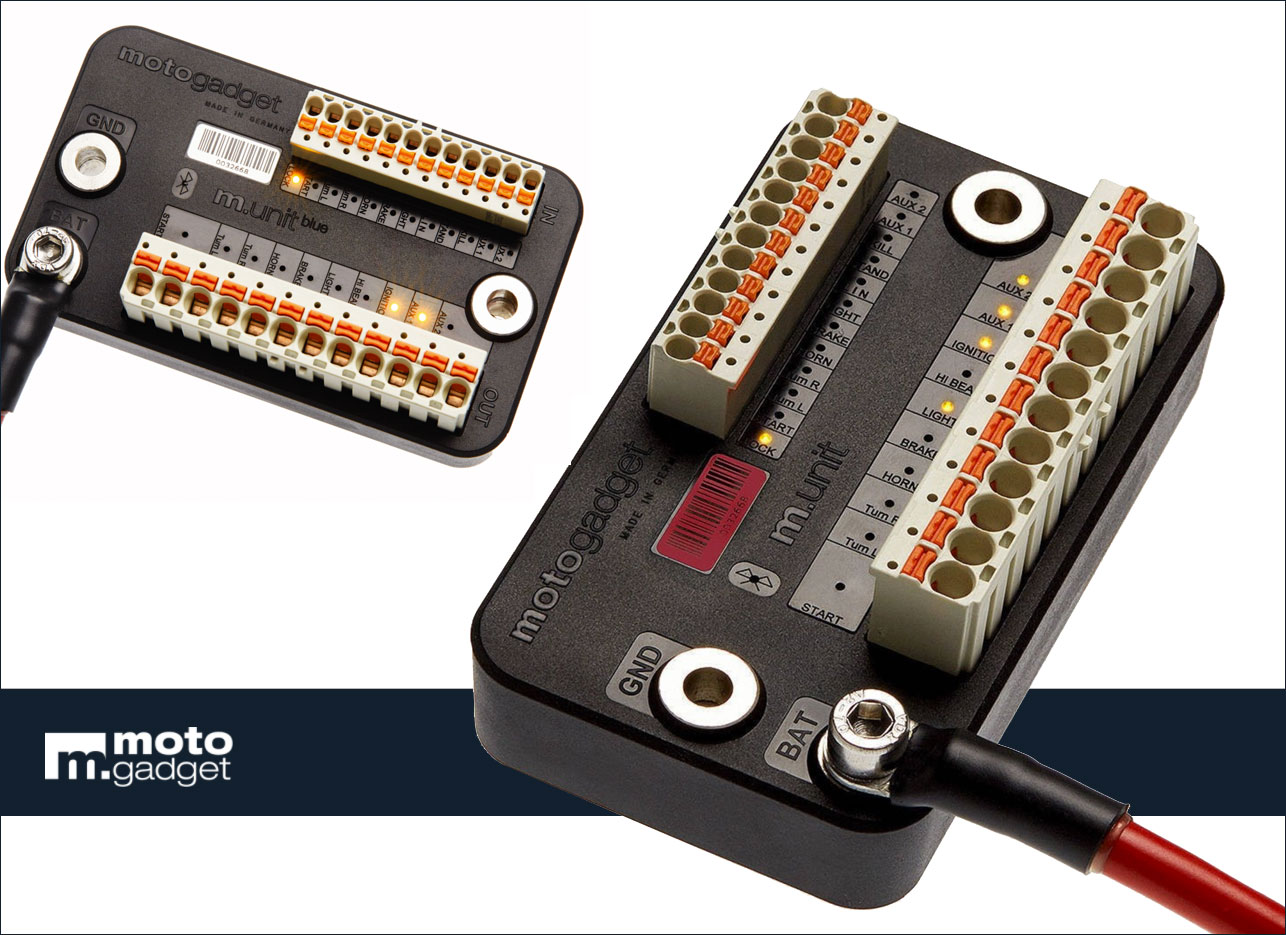
m-unit product photos — motogadget
There are a lot of articles and videos about the M-Unit, so I won’t go too deep into details. But in a few lines, here is what the M-Unit Blue does:
- It replaces your main fuse box, turn signal and headlight relays with a programmable solid-state box about the same size as a pack of smokes
- Internal fault protection, no fuses to replace
- Simplifies the wiring of your headlight, starter, turn signals, horn and headlight by using ground inputs to activate them
- Allows for the easy use of custom hand controls with push button switches
- Integrated alarm system that will flash turn signals and sound horn if bike is moved once activated
- Advanced features such as keyless Go, single wire brake light, fault detections, self-cancelling turn signals, programmable brake light modulation, and more
Before getting started, I highly recommend inspecting or replacing the following components: voltage regulator/rectifier, ignition/points/coils, stator and starter relay. You will also need a cable kit, harness wrap (we use Tesa cloth tape), eyelet connectors, 30A relay and various electrical tools (strippers, crimpers, soldering gun, shrink tube, heat gun, etc).
The beauty of the M-Unit, is the ease of installation for your peripherals – headlight, turn signals, horn and starter. The M-Unit has an input side and an output side. Simply applying a ground signal to the input side of the M-Unit for the desired function, activates a 12V+ output to that component.
So whichever switches you decide to use (factory or custom push buttons), one side of the button switch gets wired to ground, and the other side gets connected to the input on the M-Unit. The tricky part is figuring out the components that are used to actually run the bike – the ignition system (points and coils) as well as the charging system.

Wiring diagram | Honda CB750 — Brian Ballard
Before getting started, I highly recommend inspecting or replacing the following components: voltage regulator/rectifier, ignition/points/coils, stator and starter relay. You will also need a cable kit, harness wrap (we use Tesa cloth tape), eyelet connectors, 30A relay and various electrical tools (strippers, crimpers, soldering gun, shrink tube, heat gun, etc).
Motorcycles can differ in how the coils are fired ... this is best determined by examining the wiring diagram for your particular bike. In the case of a Honda CB750, the coils get 12V+ from the M-Unit Ignition output and the points ground out the coils to fire the spark plugs. The basic setup for the charging system connects the voltage regulator to the wires coming from the stator, and then there are usually two wires coming from the voltage regulator that go directly to the battery.
It is best to create a wiring diagram for your particular bike, including the M-Unit before you start. You will make changes along the way, but in the end you will have a nice reference diagram for the future. Gather information from the service manual, M-Unit manual and various other resources (online forums, technical support, facebook groups).
Ask lots of questions ... there are no silly questions. And enjoy upgrading the electrical system on your vintage bike.
A & J Cycles is located across the street from the Mt. Fuji restaurant entrance on old Route 17, five minutes from Rhodes Tavern and the entrance to Harriman State Park / 7 Lakes Drive. They are open Thursdays from 5 to 10 PM and Saturdays from 7 AM to Noon. Call 845.369.4000 or email info@ajcyclesny.com to schedule an appointment. Labor rate for the fully insured shop is $85/hour, though flat rates are available for larger projects. Pick up and drop off bike services are also available. | Links:
Other Recent Features:


Leave a Comment